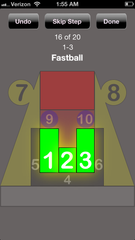
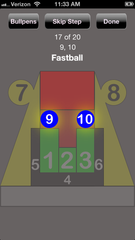
The Go Zone 1/2/3 is Green to represent Passage. Use the Go Zone to get ahead in the count 0-1. If you don't get ahead, the hitter can narrow down pitch possibilities and expect a fastball. They can wait for one pitch in one Lokation while in hitter's counts (1-0, 2-0, 3-0, 2-1, 3-1).
When you can throw an off-speed pitch in the Go Zone the hitter has to respect strikes with different speeds and movement. When a hitter knows you cannot command anything other than a fastball, they sit on the velocity and movement of a fastball. Then their averages and power increase because they have good timing on the pitch while expecting it.
Anytime you are changing speeds in the Go Zone on consecutive pitches, your chances of disrupting the hitter’s timing are better. The more pitches a hitter sees with the same speed and Lokation, the easier it is for him to time the pitch and drive it. If they consistently see fastballs while in hitters counts then they will expect the fastball and timing will be better.
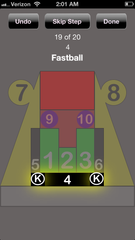
The 4 Chase Zone guarantees a downhill plane with any pitch you throw. Hitter's rarely hit pitches in the 4 Zone for extra bases. It is almost as important to miss in the correct Zones as it is to hit desired Zones. The name of the game in pitching is damage control.
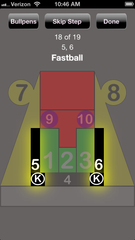
When facing a hitter that is not disciplined at the plate and likes to swing at everything, target the Chase Zones earlier in the count. There is no reason to throw a pitch down the middle of the plate if the hitter is willing to swing at Chase pitches in any count. One of the biggest parts of scouting reports is to know which hitters are impatient.
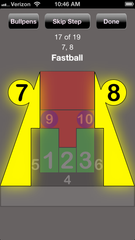
The arm-side Purpose Zone is a good place to aim a bigger breaking ball for the pitch to end in the Go or Chase Zone. Usually the slower the breaking pitch is, the bigger the break it has. Aim at the arm-side Purpose number from the mound if you have a bigger and earlier break on the curveball. This bigger breaking ball for a strike has also been called the "get me over" curveball.
The arm-side Freeze Zone is a good target to aim a shorter breaking ball for the pitch the end up in the Go Zone or Chase Zones. Understand how much your breaking ball moves when deciding where to aim. If you want to throw a short tight breaking ball in the 4 Zone or below then start the pitch in the Go Zone. Freeze Zones are also good targets to hit when you are attempting to jam the hitter. It takes very quick hands and a good swing to hit an inside Freeze Pitch and keep it fair.

If you're throwing a fastball behind in the count, the Freeze Zones turn to Danger Zones. Generally if the hitter is expecting a fastball, the flat planed pitch is more dangerous than when you're ahead in the count. But when the hitter is behind, they can't expect a fastball, opening up the Freeze Zones. It is much easier for the hitter to match their bat plane with the plane of the pitch when it is in the Danger Zone.

Off speed pitches in the Go or Chase Zones will generally be more effective if the hitter has seen a fastball in the O Zone. It can also be an effective pitch against hitters who have slow bat speed or like to swing at high fastballs. The opposite of high-and-hard is low-and-slow. Using this sequence is an example of changing speeds and Lokations on consecutive pitches to disrupt the hitter’s timing. It can also be called speeding up the hitter's bat.
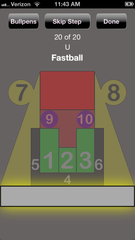
The grey area under the Chase Zones (4, 5, 6) and the Purpose Zones (7, 8) is called the Under Zone or the U Zone. It shares many of the same qualities as the Chase Zone 4 other than you will rarely get a called strike call from it. When a hitter sees a fastball in the Go Zone they recognize what the pitch looks like while the ball is in flight. If you can follow that fastball with an off speed pitch starting in the same spot of the Go Zone, the hitter will be more likely to swing after tracking the flight of the previous Go Zone fastball.
Whether or not you use a breaking ball or a change up, the off speed pitch starting in the Go Zone will most likely end up in the U Zone instead of Go Zone, making the pitch more likely to be swung at. To get swinging strikes in the U Zone it is crucial to command the Go Zone with your fastball. Hitters who have trouble with the breaking ball are very good candidates to fish for the curveball or slider in the Under Zone, especially when they are behind in the count looking to protect the plate.
Use the Lokator to visualize Zones during games. Communicate with coaches and catchers about pitch sequencing and your game plan by using numbers associated with the spots you want to hit. Use the Lokator in practice to work pitch command and to call pitches in game situations. Use the pre-made bullpen pitch sequences in the free Lokator Bullpen App to ensure getting the most out of your time and effort. Then, when game day comes, you will know that you've put in all the preparation and hard work it takes to be a successful pitcher.
Google+
Leave a comment: